Mastering Melt-in-Your-Mouth Pot Roast: Expert Tips
There are few culinary delights as universally comforting and deeply satisfying as a perfectly executed pot roast. The aroma alone can transport you to cherished family gatherings, promising a meal of tender, fall-apart meat swimming in a rich, savory gravy. Yet, for many home cooks, achieving that truly melt-in-your-mouth texture can feel like a culinary quest, fraught with tough, dry, or underwhelming results. Much like finding a life partner, as some culinary experts might quip, perfecting a classic
pot roast recipe often involves a bit of trial and error, learning from each attempt until you unlock the fundamental truths that lead to triumph.
The good news is that with a few expert insights and a generous dose of patience, you too can consistently create a pot roast that earns rave reviews. This guide will walk you through the essential steps and techniques, transforming humble ingredients into an unforgettable family feast.
The Foundation of Flavor: Choosing Your Cut Wisely
The journey to an extraordinary pot roast begins at the butcher counter. The cut of meat you select is not merely a preference; it's a critical decision that dictates the final texture and flavor. Forget lean, expensive cuts – for a truly tender pot roast, you need a tougher, more economical piece of beef.
Your best friend here is the
chuck roast. Sourced from the shoulder of the cow, chuck roast is renowned for its excellent marbling (streaks of fat) and an abundance of connective tissue, primarily collagen. This marbling contributes immense flavor and keeps the meat moist during the long cooking process, while the collagen is the real hero for tenderness. When subjected to low, slow heat, this tough connective tissue breaks down and transforms into gelatin, basting the meat from within and creating that silky, succulent texture we all crave.
While chuck roast is the gold standard, other suitable alternatives include
brisket (specifically the flat or point cut) or
bottom round. Like chuck, these cuts possess the necessary connective tissue that, given enough time, will yield to tenderness. What all these cuts have in common is their inherent toughness before cooking – a toughness that, paradoxically, is the secret to their ultimate succulence. Remember:
the right cut and patience are paramount to achieving tenderness. When selecting your meat, look for good marbling and a fairly uniform thickness to ensure even cooking.
The Art of the Sear: Why Browning Matters
Once you have your perfect cut, the next crucial step is browning the meat. While some might deem this optional, we firmly believe it's non-negotiable for an absolutely superior pot roast. Browning isn't just about appearance; it's about flavor development – a process known as the Maillard reaction. This chemical reaction occurs when amino acids and reducing sugars in the meat are exposed to high heat, creating hundreds of new flavor compounds that add incredible depth, complexity, and a savory crust that simply can't be achieved otherwise.
Tips for a Perfect Sear:
- Pat Dry: Always pat your meat thoroughly dry with paper towels before browning. Moisture on the surface will steam the meat instead of searing it, preventing that beautiful crust.
- Hot Pan: Heat a heavy-bottomed pot, like a Dutch oven, over medium-high heat until it’s screaming hot. Add a high smoke point oil (like canola or grapeseed) and let it shimmer.
- Don't Overcrowd: Brown the roast in batches if necessary. Overcrowding the pan lowers the temperature and causes the meat to steam rather than sear.
- Patience is Key: Let each side brown undisturbed for 3-5 minutes until a deep, rich crust forms. Turn with tongs and repeat on all sides, including the ends.
Don't stop at just the meat! After browning the roast, briefly sautéing your aromatic vegetables (onions, carrots, celery, garlic) in the same pot allows them to caramelize and absorb those delicious fond bits left behind by the beef, further enriching your final dish.
Liquid Gold: Braising for Unrivaled Tenderness
With your meat beautifully seared and aromatics softened, it's time to introduce the braising liquid – the "liquid gold" that will transform your tough cut into tender perfection. This liquid serves several vital purposes: it provides moisture, infuses flavor, and creates the steamy environment needed to break down connective tissues.
Choosing Your Braising Liquid: Wine or No Wine?
One common question for any classic
pot roast recipe is about adding wine.
- With Wine: A dry red wine, such as a Cabernet Sauvignon or Merlot, adds incredible depth, acidity, and complexity to the braising liquid. You don't need an expensive bottle; just avoid anything sweet. The alcohol cooks off, leaving behind a nuanced flavor.
- Without Wine: If you prefer to skip the wine, a good quality beef stock (or even chicken stock for a milder flavor) is an excellent substitute. Ensure you use enough to create a flavorful base. In fact, many recipes call for beef stock in addition to wine, creating a truly robust liquid.
Regardless of your choice, make sure to deglaze the pan after browning the meat and vegetables. Pour in a bit of your chosen liquid and scrape up all those flavorful browned bits (the "fond") from the bottom of the pot. These bits are pure flavor concentration.
Beyond the main liquid, don't forget other flavor enhancers:
- Aromatics: Fresh herbs like bay leaves, sprigs of thyme or rosemary, and whole garlic cloves infuse the liquid with their fragrant essence.
- Acid: A touch of tomato paste or a splash of Worcestershire sauce can add another layer of umami and acidity, balancing the richness of the beef.
- Seasoning: Don't forget salt and freshly cracked black pepper. Season the meat generously before browning and taste the braising liquid to adjust seasoning as needed.
The general rule of thumb is to have your braising liquid come about halfway to two-thirds up the sides of the roast. This ensures proper braising without completely submerging the meat.
Low, Slow, and Oh So Delicious: The Patience Principle
This is where the magic truly happens. Once your pot roast is nestled in its flavorful bath, it's time to seal the deal – literally. Cover your pot tightly with a lid. This traps the moisture, allowing the beef to braise in its own delicious juices and steam. The result is unparalleled succulence.
The most crucial advice for any
pot roast recipe is patience. You simply cannot rush a pot roast. High heat will toughen the meat and dry it out, leaving you with a chewy disappointment. The key is to cook it low and slow, allowing ample time for that connective tissue to break down into tender, luscious gelatin.
Choosing Your Cooking Method:
Pot roast is wonderfully versatile and can be cooked using several methods, each with its own advantages:
- Oven (Dutch Oven): This is a classic method for a reason. Cooking in a heavy, oven-safe pot like a Dutch oven at a consistent temperature (typically around 325-350°F / 160-175°C) provides even heat distribution. You can often do all the browning and braising in the same pot, creating less cleanup. An oven-baked pot roast often yields a beautiful, slightly caramelized top crust if you uncover it for the last half hour or so. The aroma filling your home as it bakes for 3-4 hours at 350°F is an added bonus!
- Slow Cooker: For ultimate convenience, the slow cooker is a fantastic choice. After browning your meat on the stovetop (highly recommended, though some skip it), transfer everything to the slow cooker and let it gently simmer for 6-8 hours on low or 3-4 hours on high. It's perfect for busy weekdays, allowing you to "set it and forget it."
- Instant Pot/Pressure Cooker: If time is of the essence, a pressure cooker can significantly reduce cooking time. While it speeds up the process, some argue that the depth of flavor developed over hours in the oven or slow cooker is slightly more profound. However, modern electric pressure cookers can produce incredibly tender results in about 60-90 minutes of pressure cooking time.
Regardless of the method, the goal is the same: to cook the meat until it's fork-tender and easily shreds. An internal temperature of around 200-205°F (93-96°C) indicates that the collagen has fully broken down. You can find more detailed comparisons and tips on these methods in our article,
Pot Roast Q&A: Browning, Wine, and Top Cooking Methods.
Enhancing Your Pot Roast Recipe: Beyond the Basics
A few final touches can elevate your pot roast from great to unforgettable:
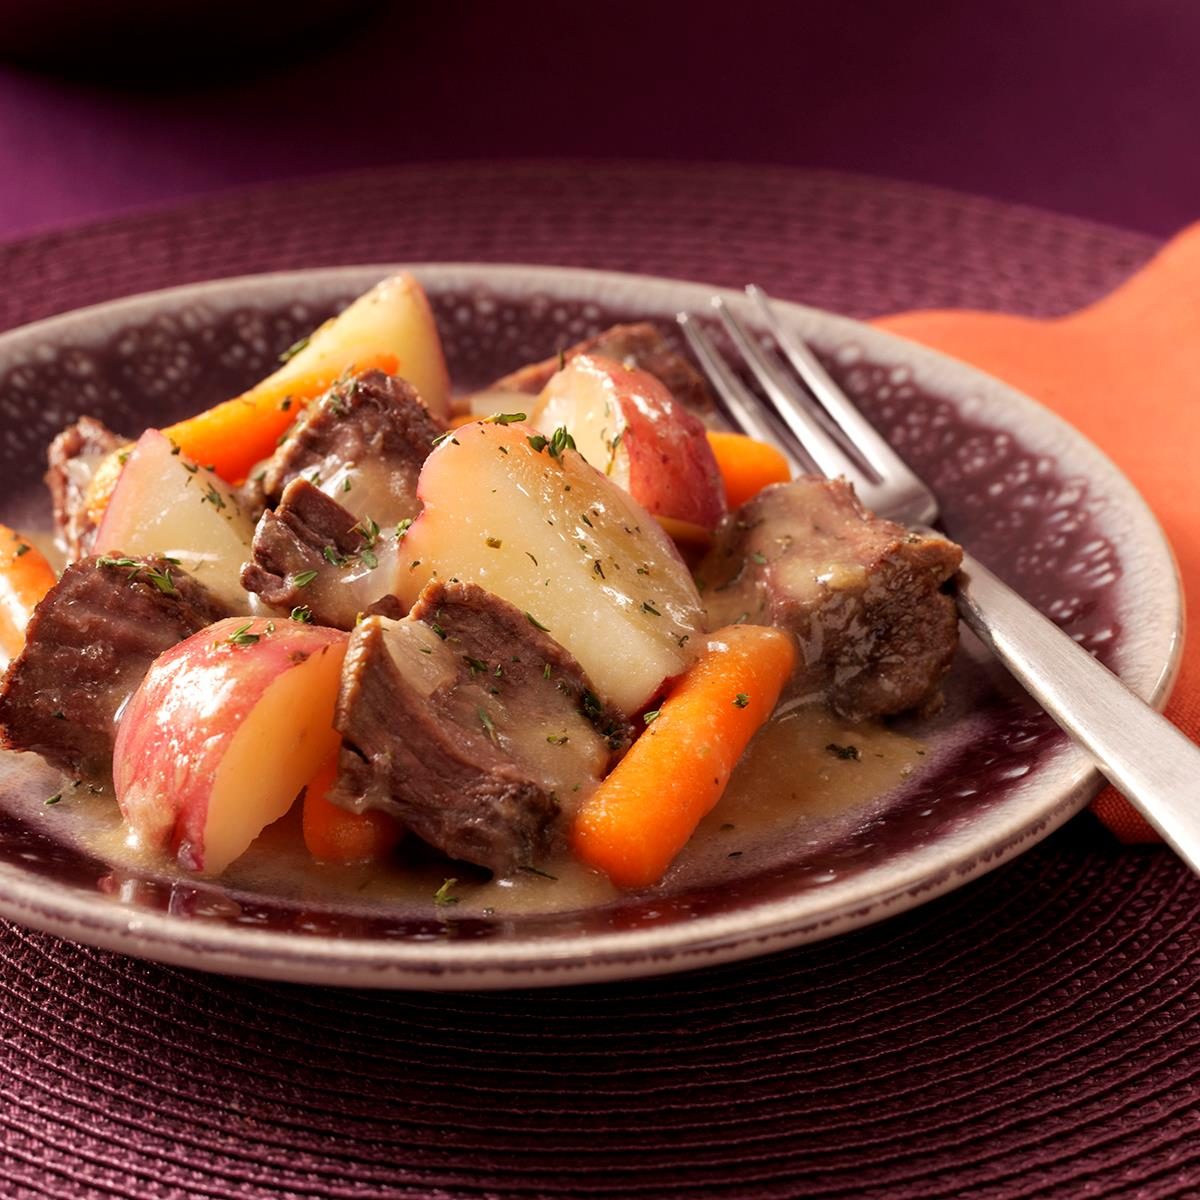
- Vegetables: If adding heartier vegetables like potatoes and carrots, consider adding them about 1.5 to 2 hours before the roast is done. This prevents them from turning to mush. Smaller, quicker-cooking vegetables like peas or green beans can be added right at the end.
- Thickening the Gravy: After removing the cooked roast and vegetables, you can thicken the remaining braising liquid into a rich gravy. Skim off any excess fat, then create a slurry of cornstarch or flour mixed with a little cold water and whisk it into the simmering liquid until thickened to your desired consistency.
- Resting the Meat: Just like a steak, allow your pot roast to rest for 10-15 minutes after removing it from the pot. This allows the juices to redistribute, ensuring every bite is moist and flavorful.
Conclusion
Mastering a melt-in-your-mouth pot roast is a truly rewarding culinary achievement. It's a dish that teaches us the virtues of patience, the power of proper technique, and the incredible transformation that can occur when humble ingredients are treated with care. By focusing on the right cut of meat, executing a thorough sear, creating a rich braising liquid, and embracing the low-and-slow cooking method, you can confidently prepare a
pot roast recipe that will be remembered and requested for years to come. So, gather your ingredients, find your largest Dutch oven, and embark on your journey to pot roast perfection – your taste buds, and your family, will thank you.